Have you ever wondered how long your winch motor is going to last? Yeah, we know. Not many people give a thought about that.
But even so, let us remind you that your winch’s main part is its motor. So performing various tests on your motor from time to time is kind of a mandatory thing.
Why? You may ask. Well, for starters, doing bench tests on your winch motor ensures whether it’s working properly or not. Also, it tells you how long your winch is more likely to last.
So, How to Bench Test a Winch Motor? All you have to do is sit tight and go through this article to the very end.
In this article, we are going to tell you in detail how you can bench test your winch motor.
How To Bench Test A Winch Motor
Winch Motor Bench Test: The Definition
By doing a winch motor bench test, you can get a detailed report of how well your motor is working and how it’s likely to work in the future. It indicates if your motor parts are working correctly or not.
If your winch is malfunctioning, by doing a motor bench test, you can determine if the problem lies in your motor or other parts of the winch.
Additionally, doing a winch motor bench test gives you an idea if you need to repair your motor or it is completely damaged for good.
Sometimes your motor can be repaired and reused. On the other hand, sometimes your motor is fully damaged to the point where it can never be repaired.
Also, by doing a winch motor bench test, you can determine if it’s economically viable to repair your motor or is it better to just get a replacement.
Familiarize Yourself With The Winch Parts
Although various types of winches come with different types of machine parts, you’ll see the following parts in every type of winches:
- Winch rope: Winch rope is the wire that the winch will reel in and reel out.
- Motor: It’s the main component of the winch that will rotate its shaft. This rotating motion will be utilized to reel in your winch’s rope.
- Winch drum: Wind drum is the cylindrical-shaped drum on which the wire/winch rope will be wound.
- Gear: Gears are the component of your winch that controls the speed of the winch’s reeling speed. By using the gears, you can level up your winch’s winding speed or level it down.
- Braking system: The Braking system is the component of your winch that forces your winch to shut down or to stop its winding of the winch rope.
- Solenoid: Solenoid of the motor is also known as the “coil” of the motor. It is the internal copper windings in the armature of the motor that creates the electromagnetic force for the motor to run.
Now that you have got familiar with the parts of the winch, let’s see how we can bench test the winch motor.
How To Bench Test A Winch Motor
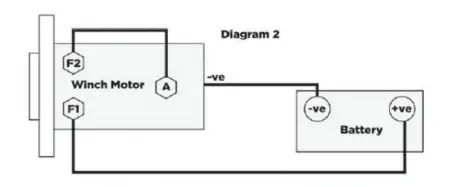
Before we go onto the bench testing steps, you should know that there are 3 connection points on the motor of the winch. Those points are known as, “F1”, “F2”, “A”.
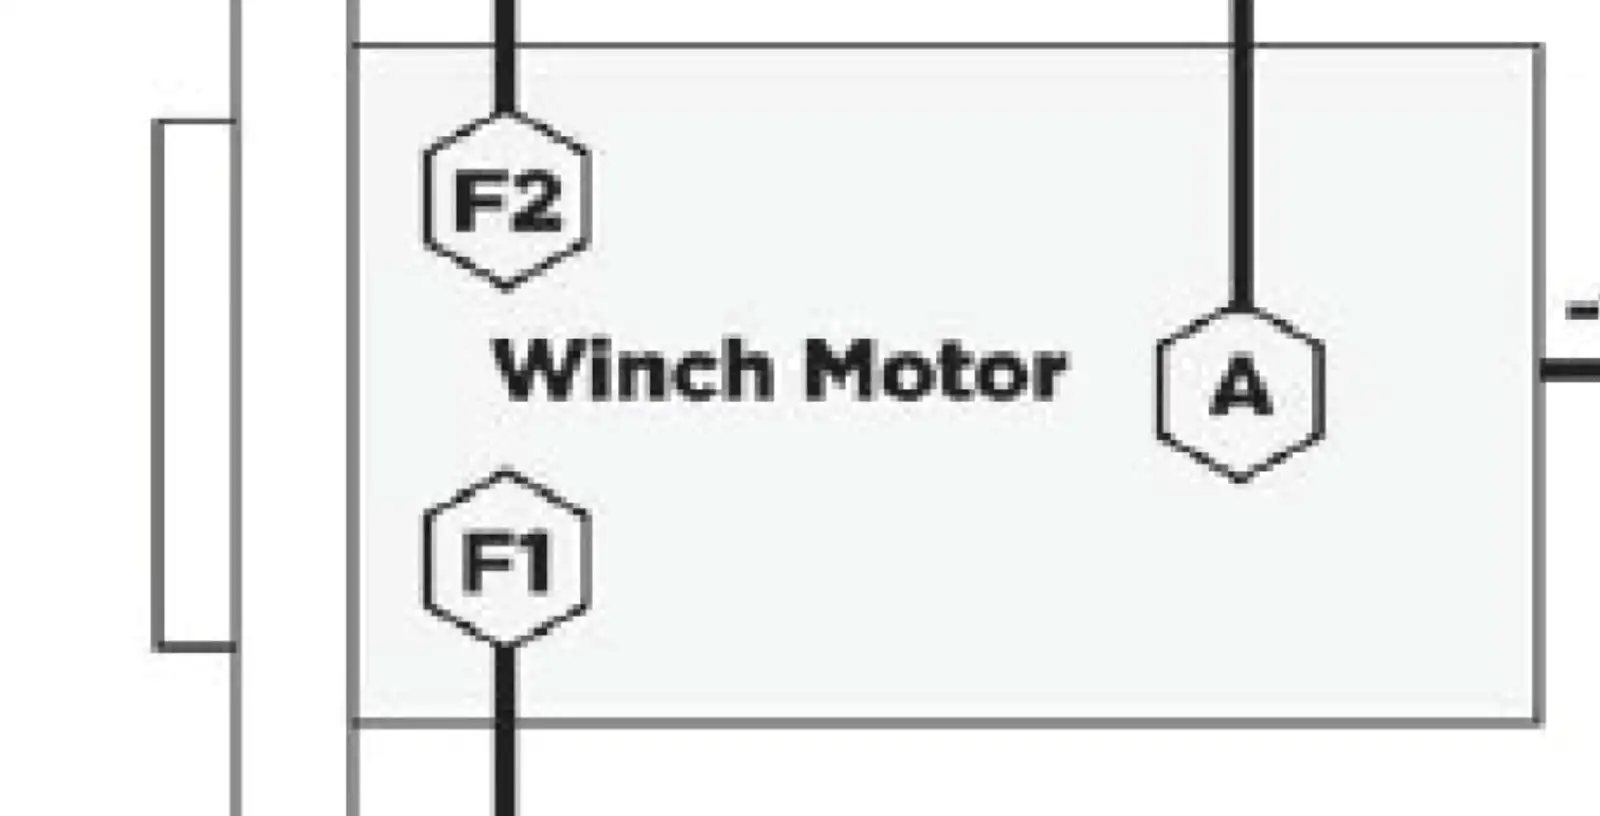
You might ask, what are these connection points?
Without going into the technical details, let us just tell you that supplying electricity to point “F1” rotates the motor shaft in one direction (i.e.: clockwise), and supplying electricity to the “F2” point rotates the motor to the opposite direction (i.e.: counter-clockwise).
Supplying electricity to the point “A” gives electric current to the armature of the motor (it’s necessary for the motor to run).
Necessary items to perform bench test on the winch motor:
- The motor itself
- Car battery
- Jumper wire
Now, let’s see the steps of bench testing the motor:
Part 1:
- Step 1: Disconnect the motor from your vehicle and put it on the counter for testing. Put the battery beside the motor too.
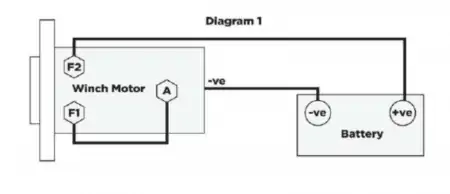
- Step 2: In the battery, there are two terminals: “positive” and “negative”. Connect the “negative” terminal of the battery to the body of the motor. This will give the ground connection to the motor’s mechanical body. You will have to make this connection with a jumper cable.
- Step 3: With another piece of the jumper cable, connect the “F1” terminal to the “A” terminal of the motor.
- Step 4: Now, with another jumper cable, connect the battery’s “positive” terminal with the “F2” terminal of the motor.
- Step 5: In this step, your motor should be started. You will see it’s a shaft rotating in a direction. If you see your motor has started, it means up until now, your motor is showing good results in the bench test.
Now, let’s get onto the other part of the test.
Part 2:
- Step 1: Disconnect all connections between your motor and your battery.
- Step 2: Connect the battery’s “negative” terminal to the motor’s mechanical body. This will provide the motor with a ground connection.
- Step 3: With a jumper cable, connect to the “F2” terminal of the motor to the “A” terminal.
- Step 4: Now, with another jumper cable, connect the “F1” terminal of the motor to the battery’s “positive” terminal.
- Step 5: Notice if the motor is rotating in the opposite direction relative to its previous rotating direction in “Part 1”. You should see its shaft rotating in the opposite direction.
- Step 6: If you do indeed see it rotating in the opposite direction, it means that the motor is healthy and fully operational.
Now, let’s get to know what it means if you notice that the motor isn’t rotating after you have connected it to the battery according to the instructions in “part 1″ and ” part 2″.
What It Means If the Motor Doesn’t Get Started
If there’s no rotation in the motor after connecting it to the battery according to the above-mentioned steps, this indicates that your motor is completely damaged. As a result, it needs to be replaced.
This may not be economically viable to repair it because the price you are going to pay for its repair will most likely be enough to get you a new motor anyway.
Other Problematic Parts Of A Winch
So, you blamed your winch motor for the malfunctioning of the winch and performed the bench test on the motor.
But, as a result, you found out that the motor is not the culprit. Now, what to do? How do you know which part is indeed the problem creator?
In order to find out which part is causing the problem, you need to check each part separately. Below, we have mentioned a few probable problematic parts that might just be the cause of the malfunction:
#1. Problematic Switches
Switches are the keys that control the flow of electricity through the various parts of the winch. If the switches are damaged, the parts of a winch cannot work in synchronization.
So, you should check thoroughly if you have any damaged switches in your winch.
If you see your switches have gotten very old, just replace them with new switches. This might be enough to solve the malfunctioning of the winch.
#2. Faulty Wiring
When the winch is not functioning properly or is reeling in the wire very slowly, this can be the problem of faulty wiring in your winch.
If the winch’s wiring is done with local wires instead of high-grade wires, this could lead to the problem of the winch’s malfunctioning.
If you notice that your winch is running on low-grade wiring, the first thing you should do is replace the wiring. If you yourself cannot do it, just take it to an expert.
#3. Tripping of Circuit Breaker
The tripping of a circuit breaker in your winch is a pretty common phenomenon. If too much load is put on the winch or too much electricity flows through the circuit, the circuit breaker will likely trip.
If any occurrence of short circuits happens in the circuitry of the winch, the circuit breaker will trip itself to protect the circuit.
In order to make sure that there is no short circuit in your winch’s circuitry, use high-grade wires in the circuit.
In addition to that, a low-grade circuit breaker can also be the problem maker.
If your winch has a low-quality circuit breaker, it won’t be able to detect the original security threats in the circuit. Instead, it will trip itself very often even when there is no short circuit in the winch’s circuit.
The best solution to this is to change the existing circuit breaker and install a high-quality circuit breaker.
#4. Corrosion in the Circuit or Mechanical Parts
If you haven’t used your winch for a long time, it can lead to the accumulation of corrosion in the wires or the circuits of your winch. Also, corrosion can affect your mechanical parts as well.
If you are not getting enough efficiency from your winch or its motor, this might be the time to check if there’s any corrosion in the internals of your winch.
To prevent corrosion, the best solution is to use the winch from time to time and not let it stay idle for a long time.
#5. Faulty Gears
As there are two kinds of gear in a winch: sliding and mechanical gears, faults in even one type of gear can cause the whole winch to malfunction.
If your gears are not properly supporting the mechanical functions of your winch, the winch will rudely respond by not providing enough efficiency in its performance.
If you find any faulty gear in your winch, the first thing to do is take it out and clean it.
Sometimes the gear itself is not the cause of the problem, instead, rust and dirt on the surface of the gear cause it to malfunction.
We recommended that you apply some mechanical oil to the gears after cleaning them. This will render them capable of performing smooth mechanical action.
But if you see your gears are damaged, we are afraid that no other way but to replace that gear if you want to keep using your winch.
#6. Blown out Fuse
The fuse is the device that protects your winch’s circuit from the extreme load of electric current. Also, if you put an extreme load of weight on the winch, it will likely cause the fuse to melt or get blown out.
Once a fuse is blown out, you have to reinstall a new fuse to run your winch. Not using the winch for a long time can also cause the fuse to get blown out when you first start your winch after a long time.
#7. Damaged Brush
In addition to other parts of the winch, the motor brush also requires your attention from time to time. The brush resides inside the motor and provides the motor’s armature with electricity.
After multiple years of usage, the brush of the motor wears down and causes the winch to malfunction.
So, we suggest that you check the motor brush if you feel that your winch is failing to run as efficiently as before.
If you notice that the motor brush is totally damaged, be cautious in advance and just replace it.
Finishing Words
We have tried to explain how to bench test a winch motor and covered almost all the causes of malfunction in the winch’s performance in the above discussion.
If your winch is not starting at all, it is majorly because of the motor getting completely damaged.
But after doing a bench test, if you find out that your motor is working perfectly, look for problems in other parts of the winch.
However, sometimes it’s not possible for a general user to diagnose the underlying problem. In cases like that, we recommend taking the winch to an expert technician. Hope this helped you.
![Read more about the article 10 Best Small Winch Reviews [The Ultimate Buying Guide]](https://autopartsguideline.com/wp-content/uploads/2021/03/best-small-winch-300x209.webp)
![Read more about the article How Does A PTO Winch Work? [Power Take Off Winch 101]](https://autopartsguideline.com/wp-content/uploads/2022/02/how-does-a-PTO-winch-work-300x194.webp)
